Booting Fedora 19 live USB from within Grub2
This may seem obvious to some, but it wasn’t to me. I have spent the last number of hours on and off trawling bug reports and forums for the answer. Anyway, I’m not sure whether it makes any difference, but I am running Grub 2 as a coreboot payload. Perhaps that makes the command line incantation slightly different to the norm. Without further ado.
insmod ehci linux
set root=(usb0)
linux /isolinux/vmlinux root=live:/dev/sdb1
initrd /isolinux/initrd.img
boot
Easy when you know how …
Compiling your own Coreboot firmware for the Samsung Series 5 550 Chromebook
Okay, so, why would you want to do this? Well, in a nutshell, so your Chromebook pretty much behaves like a normal laptop i.e. no secure boot, will boot from any USB key, no more signing kernels and dd’ing them to obscure partitions, etc, etc. Before you start: It’s important to note this comes without any warranty, express or implied. If something goes wrong you will end up with a bricked Chromebook. If that happens you can purchase a Bus Pirate, Bus Pirate probe cable, and Pomona 5250 SOIC clip and get unbricking, as per my previous post. This will also make ChromeOS unbootable, so if you want to use ChromeOS at all, then don’t do this. The impatient and ill-resourced among you can scroll to the end for instructions on how to download and flash my Coreboot build, which again comes without any warranty and could bring hell and damnation upon your souls. There is now a patch which allows all 4 GB of RAM to be recognised, but it takes 5 seconds to reach the SeaBIOS prompt on a cold boot.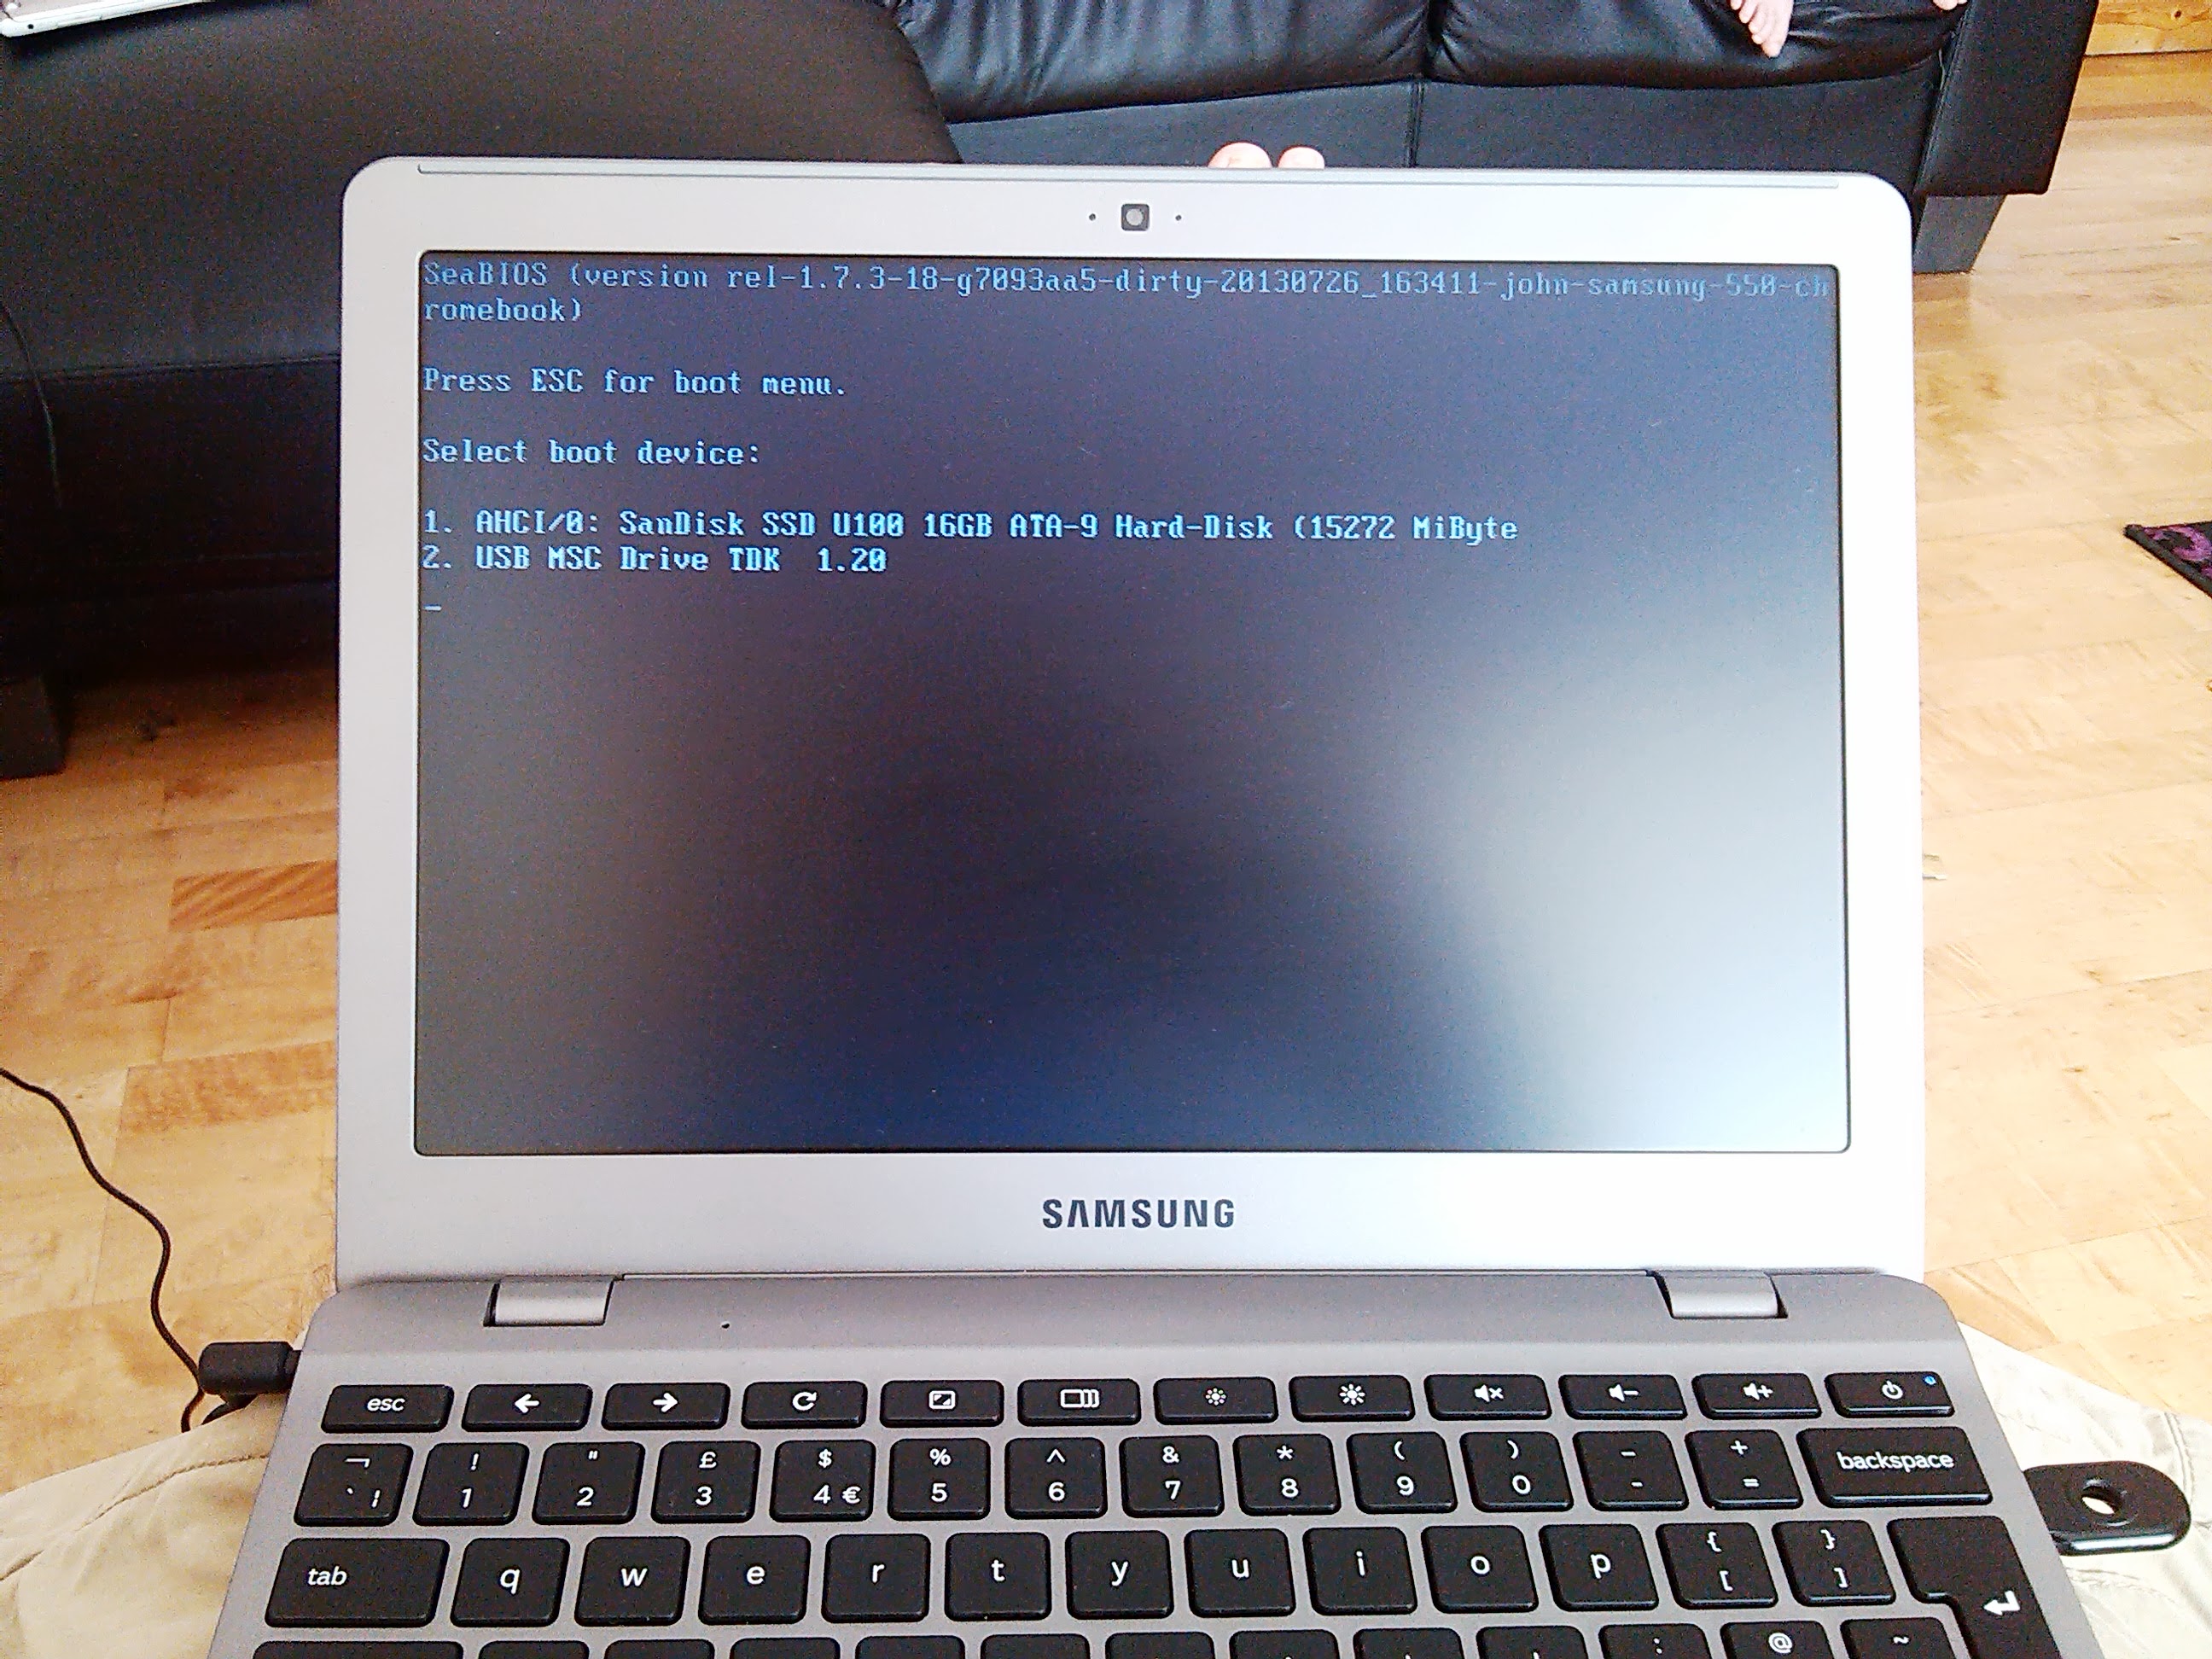 Continue reading “Compiling your own Coreboot firmware for the Samsung Series 5 550 Chromebook”
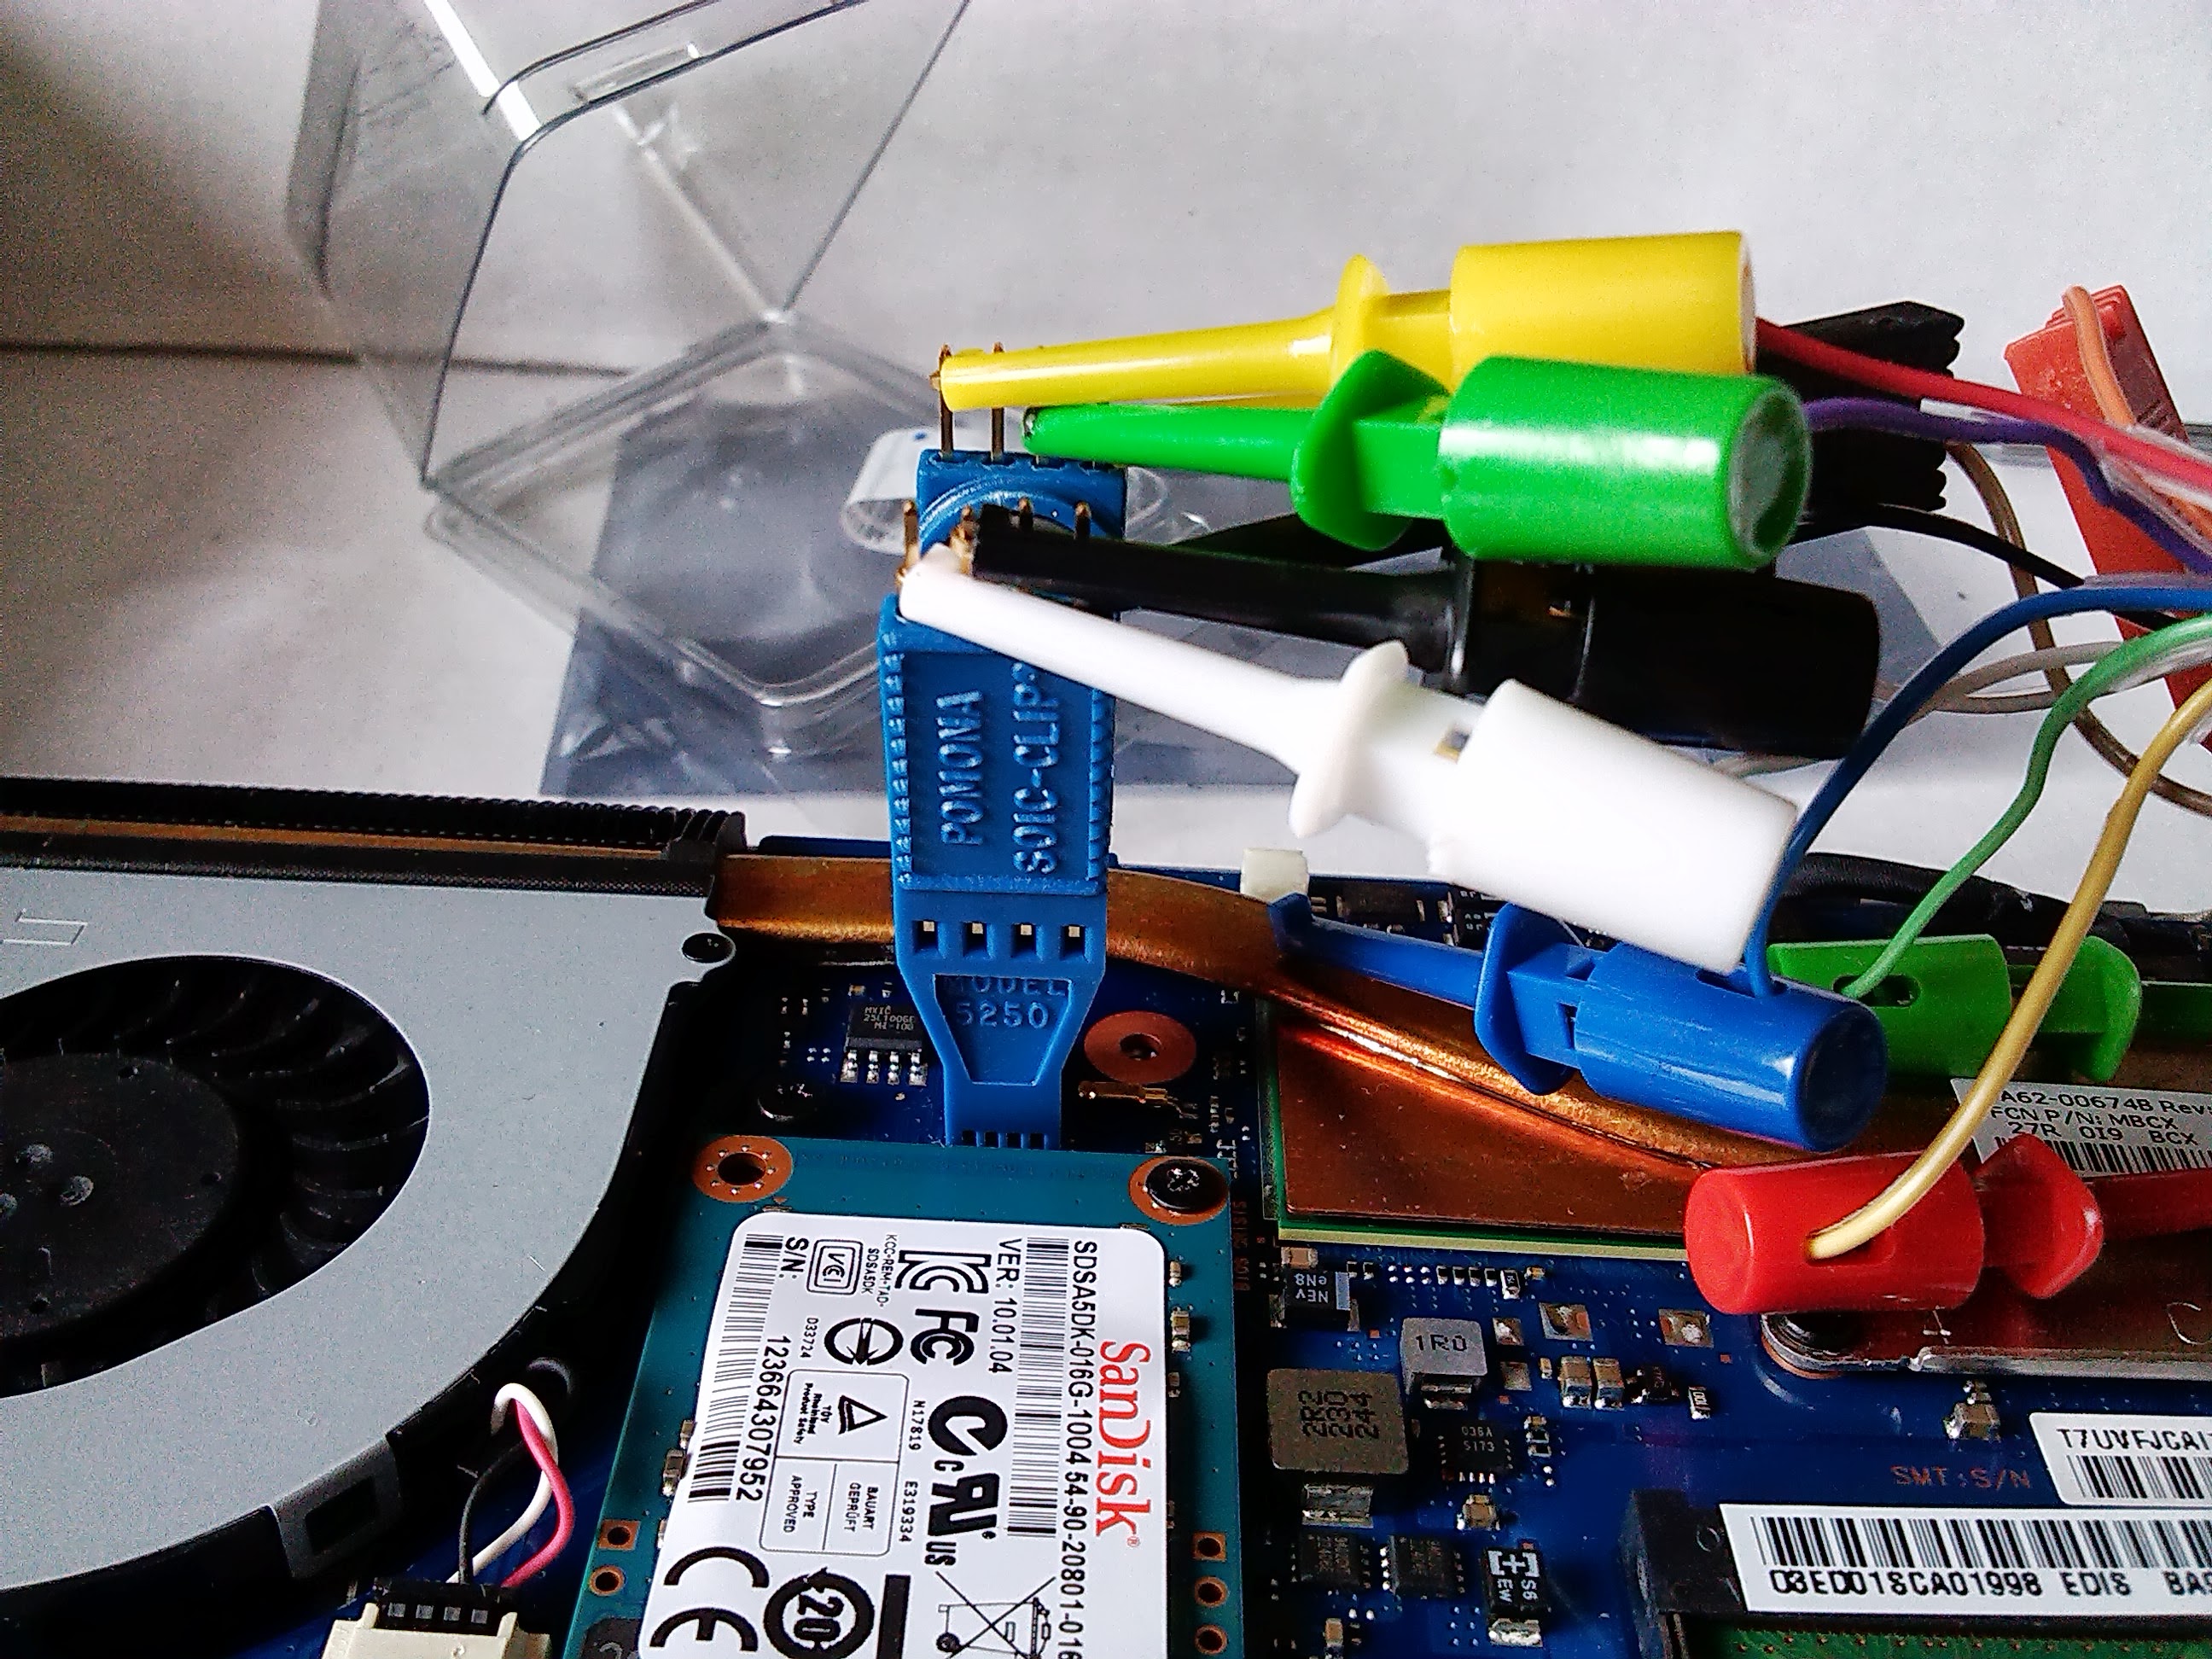
Unbricking a Samsung Series 5 550 Chromebook

I recently tried to enable hardware VT extensions on my Chromebook using the Hacking VMX Support instructions on the ChromiumOS website and it didn’t work. Not only did it not work, I also had a second go at doing it, following the instructions verbatim (despite it leaving 3 “bad” instructions in there). This left me with an expensive paper-weight. This is how I’ve come to know how to unbrick the 550.
If you are here I’m assuming you are in a similar situation, and, hopefully, have a copy of the original firmware to hand, with which to unbrick. You will also need another laptop with a suitable Linux distro loaded, such as Ubuntu/Fedora, and have Flashrom installed. Onto parts. You will need a Bus Pirate, a Bus Pirate probe cable, and a Pomona 5250 8 pin SOIC clip. Don’t buy a 3M SOIC clip, the spring is far too strong, and it’s designed in such a way that the pins won’t make contact unless you “modify” it, see http://www.eevblog.com/forum/microcontrollers/3m-soic8-clip-waste-of-timemoney/msg33462/?PHPSESSID=e4d9fa7c85d3aee85d389405447973cc#msg33462
Continue reading “Unbricking a Samsung Series 5 550 Chromebook”
Bonding/teaming internet connections
So, perhaps you are too far from your local exchange to get a decent DSL speed, or you have an urgent large download and want to use a secondary internet connection to boost your speed. This article will allow you to combine 2 connections together. No ISP support is required. Connections could be all DSL, 2.4Ghz wireless, or HSDPA or any combination of, indeed any type of internet connection (latency permitting).
There are a number of expensive products on the market which do this. I want to bring this into the realms of the sys admin/computer hobbyist, after all this is the information age.
In this example I am using 1 DSL connection, with 1 HSDPA connection, but assuming you know enough to be able to implement this you should be able to change interface names or implement for more than 2 connections if you want.
You will need:-
- A computer of some sort with Ubuntu loaded on it (only for the purposes of this article, could easily be any other distro if you are prepared to adapt it).
- A dedicated server of some sort on the internet with Ubuntu (again another distro if you want to adapt, I can recommend a Kimsufi 2G for €14.99 per month ex VAT, can’t get better value than that)
- 2 internet connections, obviously.
Using schroot instead of LXC containers
So, I have been using LXC to host my server services for a period of time, with a view to keeping things portable should I need to change provider. It’s very good in that it’s integrated into the Linux kernel and in Ubuntu at least it’s not too difficult to setup, however there are a number of problems with it.
First and foremost, every time the container operating system upgrades anything to do with init scripts, it won’t boot any more, so you are forced to hold back packages with varying amounts of success. Secondly, there does seem to be some overhead running things in an LXC container, and thirdly it isn’t as portable as it could be i.e. there is no live migration. and you will have to change config files if you move hoster to reflect you new IP address.
As I’m not selling containers as VPS, I only need to run 1 server instance, and therefore don’t really need containerisation at all, enter schroot. Schroot is like chroot without the hassle and with added flexibility, in a nutshell it will mount and start everything correctly for you to the point where you can automate startup and running of services in the chroot, it doesn’t suffer from init script borkage since the init system isn’t used at all, and it’s more portable as networking is irrelevant to a chroot (it simply uses the hosts networking).
Ok so where to start, well if you are already using LXC you can use the directory your container is stored in. I opted to move mine to a sane location before starting, in the interests of convention and easy administration. So, I created a “schroot” directory in the /home directory i.e.
mkdir /home/schroot
Holy Cow – BTRFS!
Recently I have been experimenting with BTRFS. BTRFS is a relatively new filesystem which has modern features, high performance, scalability, supporting file-system snapshots and on-the-fly compression.
After spending the week running BTRFS on Ubuntu from within a Virtualbox VM I reinstalled my laptop using it. Ubuntu’s installer supports creating btrfs partitions, which is handy, and it is reported to work even as a boot partition. I had problems using BTRFS as the boot partition however, so elected to use ext2 for boot in the real install.
The installer doesn’t support enabling the on the fly compression, so once I had the system installed I edited /etc/fstab adding “compress=lzo”, I added “ssd” as I have an SSD and “space_cache” which is reported to improve performance. After I rebooted I ran a filesystem balance to compress any existing compressible data like so:-
btrfs fi balance /
btrfs fi balance /home
It’s worth pointing out here that there still isn’t a utility which can fix BTRFS filesystem corruption, so although BTRFS is considered stable, you may want to stay away from it just in case. There is also a nasty condition that can cause a kernel crash if the file-system runs out of space, so that is another one to watch for.
Mobile broadband from the command line in Ubuntu
For people who want to use their HSDPA connection from the command line in Ubuntu – Perhaps you have a server you want to use it on, or perhaps you want to do it from the command line for the craic – This is for you.
There are 3 files involved “/etc/ppp/peers/provider”, “/etc/chatscripts/pap” and “/etc/ppp/chap-secrets”.
Continue reading “Mobile broadband from the command line in Ubuntu”
Managing amavisd-new quarantine from the command line
Just a quick one today. It seems to be a recurring problem for me that every once in a while I want to go into Amavisd-new’s quarantine and look for false positives (not that there should be any if it’s setup right). There are a number or graphical ways of doing this but most of them aren’t available in the Ubuntu repositories. The 2 that I could find are Horde-sam and Webmin’s Clamav module (which I have used before and is pretty easy to use if you are command-line averse). I didn’t want to add another service in order to keep resource usage as low as possible so I set about finding a way to check each email from the command line. So firstly to cycle through every quarantined email use the following command in the quarantine directory (normally /var/lib/amavis/virusmails in Ubuntu):-
Continue reading “Managing amavisd-new quarantine from the command line”
Converting to GPT in Ubuntu
GPT stands for “GUID Partition Table” and it refers to a relatively new format for disk partition tables. It was designed to get around the limitations of the MBR format, namely that you can have more than 4 primary partitions and partitions can be more than 2.2 terabytes in size. GPT is part of the EFI standard but it can also be used on standard BIOS only machines i.e. most non-MAC PCs. Converting to GPT will allow you to future proof your partitions. 2 TB disks are becoming common and it won’t be long before the 2.2TB limit of MBR will stop people using all their disk space in one partition, so in the name of usability and flexibility GPT is the way forward.