Preamble.
So, I recently purchased a Dell XPS 15 9560 (don’t get too excited – only the boggo standard one with core i5 and 1080p screen) so that I have decent hardware for work. I’ve upgraded it to 32GB of RAM, and yesterday, I installed a 1TB Samsung EV0 960 NVME drive in it.
Work have a policy that all employees should use disk/filesystem encryption, and that it should, in some way, be protected by a boot/login password. The question was, how to achieve same, so I can take advantage of the builtin encryption on these drives, and have it adequately protected.
There is not a lot of concrete information on the internetz about how to achieve this, and the information that is there is somewhat misleading. I guess this is because the tech is relatively new, and it just needs someone with a reasonable working knowledge to nail things down for people. So here I am.
Here are the important things you need to know:
- There are two forms of builtin encryption these drives can use – class0 and TCG Opal.
- Boot protection of class0 encryption is enabled by setting a HDD password in the UEFI/BIOS setup.
- Dell XPS machines don’t currently support setting a HDD password for a PCI-E/NVME M2 SSD, although they *do* allegedly support setting a HDD password for SATA based M2 SSD’s.
- The above means you can’t use class0 encryption in this hardware setup.
- TCG Opal encryption, when enabled with the drive locked, exposes a small partition which is used to boot a “shim” system that unlocks the drive with password and then reboots into the real partition/system.
- You need two things to enable it – sedutil-cli and the shim system (which is based on our old friend Buildroot).
- You have to disable UEFI secure boot to use TCG Opal in my setup, as the shim system (at least the one I’m using) isn’t UEFI compatible.
- If someone manages to steal your XPS off you, while it’s on, logged in, and the system hasn’t yet gone to screen saver, they will still have access to all your data.
- Using this will break S3 suspend.
I could’ve gone the route of compiling the cli util and image myself, and I did try this, but there is currently something wrong with the build script whereby it’s trying to download the sedutil package from an address that doesn’t currently resolve, and well, I had already spent a fair bit of time trying to get this working today, and I couldn’t be bothered. :P
Franks and beans.
I’m going to print a warning here – despite the best advice of the sedutil people, I opted to run sedutil from within the NVME drive I was locking. This causes the filesystem to become read-only/inaccessible while you’re using it, which is fun. I was particularly amused by the way I couldn’t run system binaries any more and the fan completely shut off (for once). :P
So, this also comes with the usual caveat emptor here – it’s possible you could screw something up and lock yourself out of your expensive, little drive. I am also skipping various safety steps here that the sedutil people recommend, so be very careful, you bought it, you broke it, YMMV, etc, etc.
Download the links labelled “sedutil_LINUX.tgz” and “BIOS32.img.gz” from https://github.com/Drive-Trust-Alliance/sedutil/wiki/Executable-Distributions
Extract them:
tar -xf sedutil_LINUX.tgz
gunzip BIOS32.img.gz
You will end up with a sedutils directory and a raw partition image called BIOS32.img, unsurprisingly. Run:
cd sedutil/Release_x86_64/GNU-Linux/
sudo ./sedutil-cli --initialsetup debug /dev/nvme0
sudo ./sedutil-cli --enablelockingrange 0 debug /dev/nvme0
sudo ./sedutil-cli --setlockingrange 0 lk debug /dev/nvme0
sudo ./sedutil-cli --setmbrdone off debug /dev/nvme0
sudo ./sedutil-cli --loadpbaimage debug ../../../BIOS32.img /dev/nvme0
At this point, your Linux distro (which the above assumes is 64-bit) will be pretty much unusable. :D
But, the good news should be that the image file was successfully written to the shim partition, and you can hold the power button to switch off, and try this sucker out.
I should point out here, that if something went wrong with image writing, you can download/write a RESCUE system image to a USB stick, and unlock the drive from there, if needs be.
So, when you boot, you will see syslinux load, along with a Linux kernel, and you’ll be at a prompt asking you for the password, which as we set above is “debug”.
Using “debug” seems to enable a failsafe mechanism in the PBA (Pre Boot Authentication) image, whereby even after you’ve entered the password correctly, you will still need to login (user is root, blank password), and type “reboot”, to actually reboot and go into your real partition/system. This is good.
Now your are back into your real system and we’ve verified things are working, you can set a “real” password instead of using debug:
cd sedutil/Release_x86_64/GNU-Linux/
sudo ./sedutil-cli --setsidpassword debug yourrealpassword /dev/nvme0
sudo ./sedutil-cli --setadmin1pwd debug yourrealpassword /dev/nvme0
Obviously, replace “yourrealpassword” with the password you really want, you dingbat.
When you power off and reboot this time, you will get the same prompt, except when you enter your real password, the system will immediately reboot into your real system/partition without further intervention, which is nice. :)
Below will be a pic of the shim system prompt, for your reassurance. :)
![]()
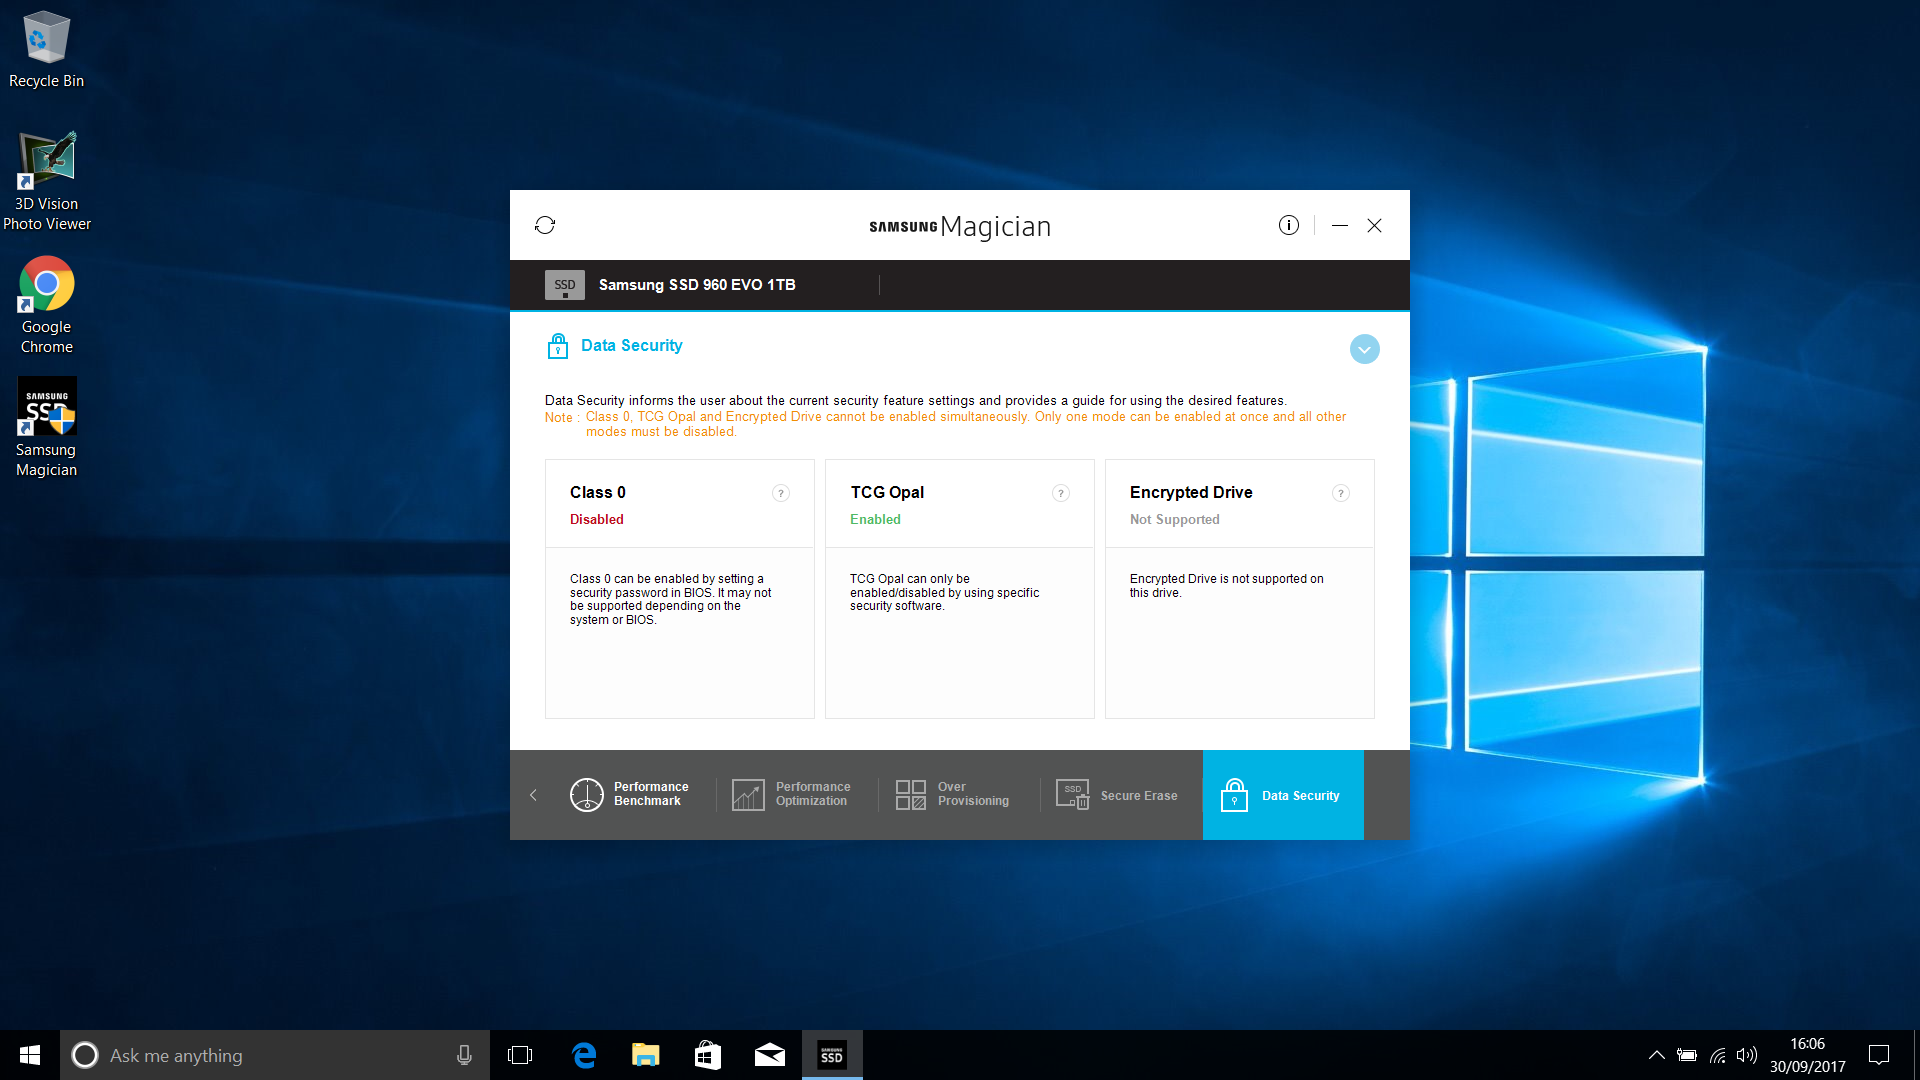
As a further verification step, I took it upon myself to install a copy of Windows 10 (I know, bleugh) on a USB device using WinToUSB from within another Windows 10 VM :P, and installed Samsung Magician in that, checking the “data security” link, to in fact verify that TCG Opal Encryption is now enabled.
Below will be a nice picture of that for your delectation too. :)
\o/
Questions? Broken? What on earth did you listen to me for …